After the launching of
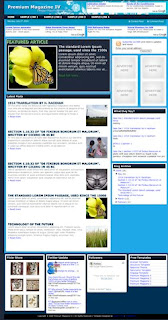
BloggerMag - A new free premium Blogger template in magazine style template, many readers love the design of the template.Now ,we add some cool features to template.Firstone ,slider for feature post.Using an auto-playing content slider isthe one of techniques to show your featured content. It saves you spaceand makes for a better user experience, and if you add a pinch of eyecandy to it, then there’s no looking back.It is easy to add slider inthetemplate by 3 steps.
- First login to blogger and goto edit html.then following the steps.Better use Notepad++ for editing the template.
Step1: Add CSS
Add the following code in my Bloggermag template code.
- Use Ctrl+f to find this code “ ]]></b:skin> “.
- Before this code “ ]]></b:skin> “ Add the following code.
/* -------------- SLIDESHOW ----------------- */
#slideshow {
width: 580px;
height:220px;
overflow:hidden;
border: 1px solid #ddd;}
#slideshow ul {
margin: 0;
padding: 0; background:transparent;
list-style: none;
height: 1%; /* IE fix */}
#slideshow li {
margin: 0;
padding: 0;
background:transparent;
list-style: none;
}
#slideshow ul:after {
content: ".";
clear: both;
display: block;
height: 0;
visibility: hidden;
}
/* -----------SLIDESHOW > SLIDES ---------------- */
#slideshow .slides {
overflow: hidden;
width: 578px;
}
#slideshow .slides ul { overflow: hidden;
width: 560px;}
#slideshow .slides li {
display:none;
list-style: none;
left:-99999em;
width:580px;
height:180px;
display:block;
overflow: hidden;
position:relative;
z-index:1;}
.js #slideshow .slides li {
margin: 0;
padding: 0;
list-style: none;
width:580px;
height:180px;
display:block;
overflow: hidden;
position:relative;
z-index:1;
}
#slideshow .slides li .entry h2 a,
#slideshow .slides li .entry h2 a:link,
#slideshow .slides li .entry h2 a:visited,
#slideshow .slides li .entry h2 a:hover,
#slideshow .slides li .entry h2 a:active {
font-size:12pt;
line-height: 1.1em;
margin:0;
margin: 0;
letter-spacing:0;
list-style: none;
}
#slideshow .slides li .entry {
overflow:hidden;
margin:-165px 6px 2px 185px;
align:right;
}
/* -----------SLIDESHOW > NAVIGATION ------------------------ */
#slideshow ul.slides-nav {
background-color: #ddd;
border-top: 1px solid #ccc;}
#slideshow .slides-nav li {
list-style:none;
float: left;}
#slideshow .slides-nav li a {
display: block;
padding: 12px 17px;
outline: none;}
.js #slideshow .slides-nav li.on,
.js #slideshow .slides-nav li.on a {
background-color: #eee;
text-decoration:underline;
}
.js #slideshow .slides-nav li.on a {
position: relative; top: -3px;}
Step2: Add Script
Add the following code in my Bloggermag template code.
- Use Ctrl+f to find this code “ </head>“.
- Before this “ </head> “ Add the following code.
<script type='text/javascript'>
imgr = new Array();
showRandomImg = true;
aBold = true;
summaryPost = 160; //
summaryTitle = 35; //
label8 = "Feature";
tLabel8 = "Feature";
Title8 = "Feature";
function removeHtmlTag(strx,chop){
var s = strx.split("<");
for(var i=0;i<s.length;i++){
if(s[i].indexOf(">")!=-1){
s[i] = s[i].substring(s[i].indexOf(">")+1,s[i].length);
}
}
s = s.join("");
s = s.substring(0,chop-1);
return s;
}
function showrecentposts(json) {
j = (showRandomImg) ? Math.floor((imgr.length+1)*Math.random()) : 0;
img = new Array();
document.write('<ul class="clearfix"style="list-style:none; position:relative;">');
for (var i = 0; i < numposts; i++) {
var entry = json.feed.entry[i];
var posttitle = entry.title.$t;
var pcm;
var posturl;
if (i == json.feed.entry.length) break;
for (var k = 0; k < entry.link.length; k++) {
if (entry.link[k].rel == 'alternate') {
posturl = entry.link[k].href;
break;
}
}
for (var k = 0; k < entry.link.length; k++) {
if (entry.link[k].rel == 'replies' &&entry.link[k].type == 'text/html') {
pcm = entry.link[k].title.split(" ")[0];
break;
}
}
if ("content" in entry) {
var postcontent = entry.content.$t;}
else
if ("summary" in entry) {
var postcontent = entry.summary.$t;}
else var postcontent = "";
postdate = entry.published.$t;
if(j>imgr.length-1) j=0;
img[i] = imgr[j];
s = postcontent ; a = s.indexOf("<img"); b= s.indexOf("src=\"",a); c =s.indexOf("\"",b+5); d =s.substr(b+5,c-b-5);
if((a!=-1)&&(b!=-1)&&(c!=-1)&&(d!="")) img[i] = d;
//cmtext = (text != 'no') ?'<i><fontcolor="'+acolor+'">('+pcm+''+text+')</font></i>': '';
var month = [1,2,3,4,5,6,7,8,9,10,11,12];
var month2=["Jan","Feb","Mar","Apr","May","Jun","Jul","Aug","Sep","Oct","Nov","Dec"];
var day = postdate.split("-")[2].substring(0,2);
var m = postdate.split("-")[1];
var y = postdate.split("-")[0];
for(var u2=0;u2<month.length;u2++){
if(parseInt(m)==month[u2]) {
m = month2[u2] ; break;
}
}
//var daystr = (showPostDate) ? '<i><fontcolor="'+acolor+'"> -('+day+ ' ' + m + ' ' + y +')</font></i>' :"";
posttitle = (aBold) ? ""+posttitle+"" : posttitle;
var trtd = '<li style="list-style:none;"id="main-post-'+i+'"><img style="height:165px; width:160px; margin:8px 0px0px 8px;" class="post_thumbnail thumbnail thumbnailpost_thumbnail"src="'+img[i]+'"/> <div class="entry"><h2class="post-title"><ahref="'+posturl+'">'+posttitle+'</a></h2> <p>'+removeHtmlTag(postcontent,summaryPost)+'</p></div></li>';
document.write(trtd);
j++;
}
document.write('</ul>');
}
</script>
Step3: Add Html
Add the following code in my Bloggermag template code.
- Use Ctrl+f to find this code “ <div class='art-content'> “.
- After “ <div class='art-content'> “ Add the following code.
<divclass="art-Block"><div class="art-Block-tl"/><divclass="art-Block-tr"/><div class="art-Block-bl"/><divclass="art-Block-br"/><div class="art-Block-tc"/><divclass="art-Block-bc"/><div class="art-Block-cl"/><divclass="art-Block-cr"/><div class="art-Block-cc"/><divclass="art-Block-body"><div class="art-BlockHeader"><divclass="l"/><div class="r"/><divclass="art-header-tag-icon"><div class="t">
FeaturedPosts</div></div></div><divclass="art-BlockContent"><divclass="art-BlockContent-tl"/><divclass="art-BlockContent-tr"/><divclass="art-BlockContent-bl"/><divclass="art-BlockContent-br"/><divclass="art-BlockContent-tc"/><divclass="art-BlockContent-bc"/><divclass="art-BlockContent-cl"/><divclass="art-BlockContent-cr"/><divclass="art-BlockContent-cc"/><divclass="art-BlockContent-body">
<div id="slideshow" >
<div class="slides">
<script language="JavaScript">
document.write("<scriptsrc=\""+home_page+"feeds/posts/default/-/"+label8+"?max-results="+numposts+"&orderby=published&alt=json-in-script&callback=showrecentposts\"><\/script>");
</script>
</div>
<ul class="slides-nav">
<li ><a href="#main-post-0" >1</a></li>
<li ><a href="#main-post-1" >2</a></li>
<li ><a href="#main-post-2" >3</a></li>
<li ><a href="#main-post-3" >4</a></li>
<li ><a href="#main-post-4" >5</a></li>
<li ><a href="#main-post-5" >6</a></li>
</ul>
</div>
<div class="cleared"/></div></div><div class="cleared"/></div></div>
Sorry,
Iforgot to mention,You have to create one Label called "Feature" or"feature"(because i added that name in the feature slider).Next,youhave to selcet the label feature when you post the feature post.Trythis.Thank you
That’s it. Save the template and view the blog.
Iwill post the Updated template in my next post.The guides and all aboutBloggermag template will be discussed at next post, so do not forgetto come back here at our website or you can subscribe via RSS Feed toget direct entry to your email.

. Yang lebih ekstrim lagi ada teman kang Rohman langsung di hapus akun blognya, yang sangat menyakitkan adalah jumlah blog dalam akun tersebut lebih dari 60 blog dan telah di kelola secara susah payah selama satu tahun lebih, gimana ngga nyesek di dada tuh.
).
). Perlu diketahui bahwa hasil import beda dengan posting baru, jika anda melakukan import maka tanggal posting serta komentar yang ada akan tetap seperti itu.


.png)


